

Install Wamp for GuppY 6
Install Wamp for GuppY 6 with Windows 10
At the official website,www.wampserver.com , I prefer the secondary repository,you have on the page all the archives, all the applications, all the tools and you select the 32 or 64 bits version according to your machine. Today almost all machines operate in 64-bit.
Attention, the 32-bit version will work on a 64-bit machine but not the other way around.
Right-click on the wampserver3.2.3_x64.exe executable and select:"Run as administrator", then follow the installation instructions. It is recommended to install WampServer at the root of disk C: either C:\wamp64 (no space).
The installation program then asks you in which directory of the Start menu to create the shortcuts: you add Wampserver64.
Everything is correct, so you click on " Install ".
During the installation, you will be offered a browser, logically your default browser. If you want to change click Yes and search for your browser's executable file, e. g. firefox. exe for Firefox.
A second question about the default text editor, I selected notepad++. exe in Program Files/Notepad++. It is free but you must have it installed beforehand.
You can read the information given and then click on " Finish ".
Start Wamp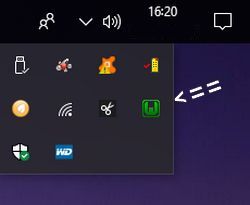
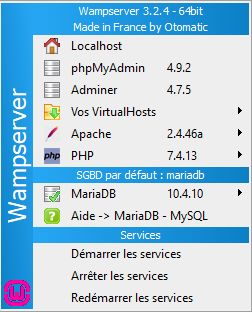
The execution of wampmanager. exe does not show much visible, except the quick opening and closing of the console.
You must go to the right of the taskbar near the clock and click the down arrow "Show hidden icons". You will see icons like Wamp's, put the mouse pointer on the icon and you will see "Local server - All services are started".
If the Wampserver icon is not present, you can place it in the notification area, Taskbar Settings > Select icons to display in the notification area.
Wamp is ready to display your projects locally.
Precise: if all services are started, the icon is green, if all services are stopped, the icon is red, if a service is not started, the icon is orange.
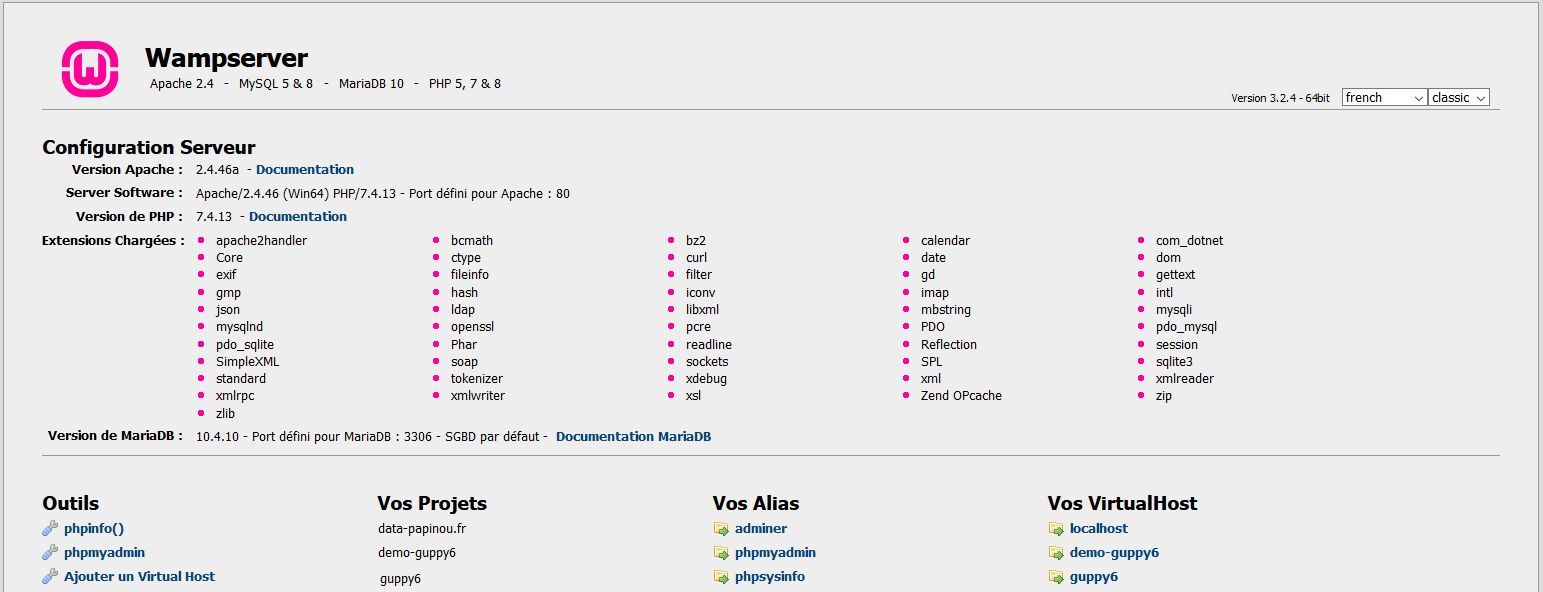
To go to the homepage, you must start your browser and type " localhost " in the address bar and you will arrive on this page.
Opening your site locally with Wamp through http://locahost/monsite is not recommended at all and causes problems, you need to add a VirtualHost for each directory added in www.
In www, create the subfolder guppy6 in which GuppY files will be copied.
The address path of this directory must not contain any spaces, underscore or accented characters.
The creation of the directory is done by opening the "www" directory in the windows explorer, right-clicking in the window, selecting the " New " option then " Folder " and then entering "guppy6".
Warning, if you want to display a backup of your site online, before creating VirtualHost you must:
1 - Edit the data/config/config/config.inc file with Notepad++,
search for line 10: $site[3] = stripslashes("https://www.monsite.com/"); // URL of the site,
replace it with: site[3] = stripslashes("http://nomdurepertoire/"); // URL of the site, and register,
in our example: $site[3] = stripslashes("http://guppy6/"); // URL of the site
If url-rewriting is enabled, you need to remove the "on" on line 42, like this: $site['URLR'] = stripslashes(""); // URL rewriting
2 - Disable the.htaccess of the root and admin by renaming them with the addition of an extension, for example.htaccess.old,
this way, they are deactivated. To reactivate them, you send them online and with FileZilla you delete the.old extension,
they will be active without changing anything in the content.
On the WampServer homepage (at http://locahost/, the subdirectory name appears in the " Your Projects " column:
The subdirectories of the www directory appear on the homepage
In the left-hand column "Tools", click on the link "Add Virtual Host and you will arrive at the page "Add Virtual Host".
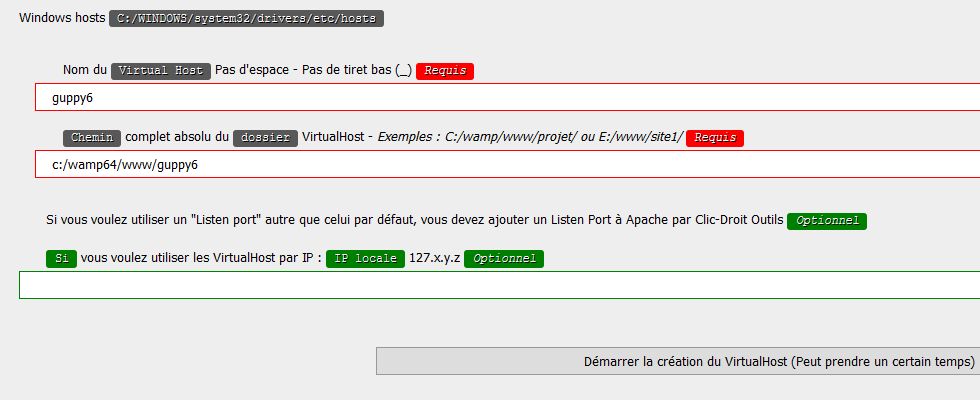
Then you enter the requested information: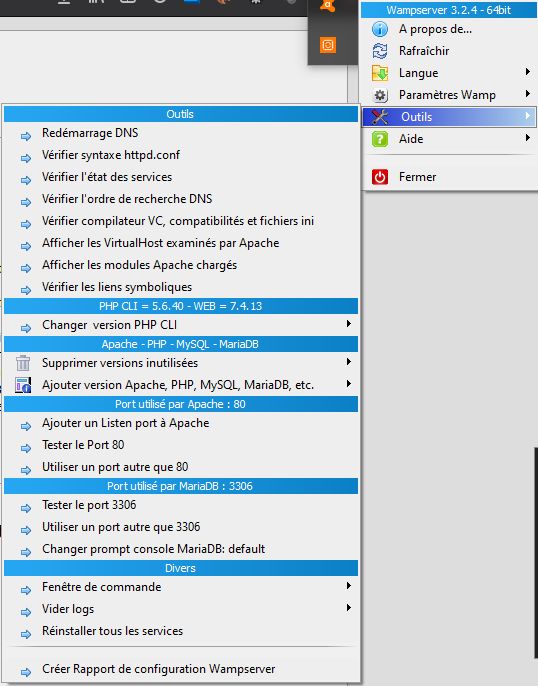
- the VirtualHost name (that used for the directory name): guppy6
- the absolute absolute path of the directory guppy6 is: c: /wamp64/wwww/guppy6
- you don't take care of the third field, leave it blank.
To finish, click on "Start the creation of VirtualHost" (bottom right).
WampServer confirms that the VirtualHost has been created but the DNS (" Domain Name System" which links the web address entered in a browser's address bar to the physical installation) must be restarted.
To restart the DNS:
right-click the WampServer icon WampServer Icon OK,
click on the "Tools" option of WampServer,
click on the DNS restart option of WampServer.
During the restart, the WampServer icon changes to red, then orange and finally green.
Now you can access the guppy6 subdirectory, a left click on the Wamp icon in the right bar near the time and date, then Your VirtualHosts and a last click on guppy6.
Your VirtualHost guppy6 opens in your browser.
In this tutorial, there is no question of SQL database not necessary for GuppY 6, you will find on the web tutorials to install the whole database part.
On the screenshot on the left you can see "Without database", so this part is not started.
I let you discover all the other links with a left click or a right click on the W icon, the automation for the use of Wamp is almost complete.
I also recommend " Run as administrator ", using port 80 for trouble-free operation.
Tutorial by Papinou for the GuppY Team - November 2017 - upgrade September 2018 - upgrade December 2020 - CeCILL Free License


