Parallax
We will configure Parallax:

Parallax:
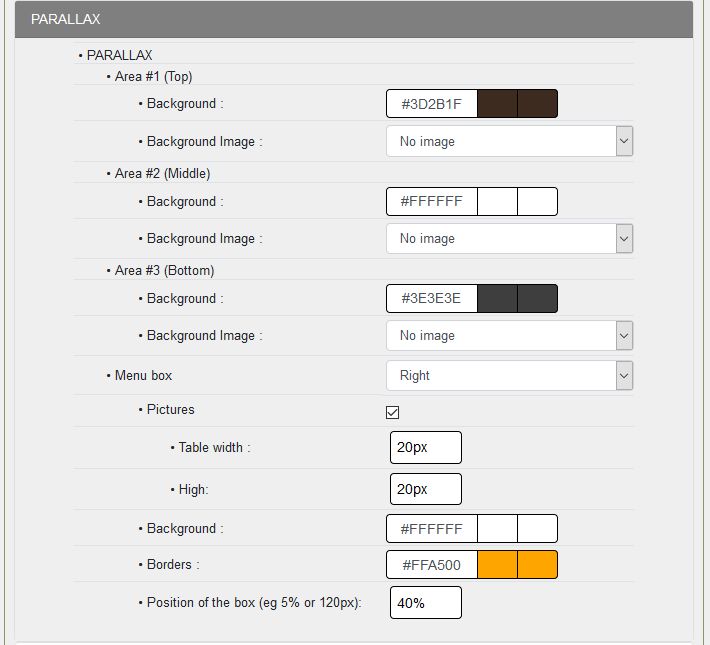
With GuppY 6, the Parallax effect and Real height are activated by default whether you use them or not.
To configure the parallax effect, you can put a color for each of the three zones or have prepared three images in 1920 x 1080px, one for the TOP zone, one for the MAIN zone and one for the BOTTOM zone.
Attention: the weight of the images, as light as possible not to slow down the loading of the page, if you put a color and an image, by default the color will be preponderant and the image will not be displayed.
For all three zones:
Zone No. 1 - Top
- Background - in the example skin, a #A9EAFE color is selected.
- You can select your first image in the img directory of the skin or in the img directory of GuppY.
Zone n°2 - Middle
- Background - in the example skin, a #CCFFFF color is selected.
- You can select your second image in the img directory of the skin or in the img directory of GuppY.
Zone #3 - Bottom
- Background - in the example skin, a color #1D4851 is selected.
- You can select your third image in the img directory of the skin or in the img directory of GuppY.
For the menu box:
- You have three possibilities: No, Left and Right, in the example Right is selected.
- Pictures are checked, the pictures of the three little arrows are located in the folder img of the skin (para1, para2, para3),with 20px for the width and 20px for the height,
- Background - you choose the background color, in the example #FFFFFF
- Borders - you choose the color of the border, it will be #73C2FB
- Box position - 40%, the three small arrows will be displayed on the right side of the screen,
Here for Parallax, the easiest way is to do some tests, for example with three of your images.
I repeat the images must be in 1920x1080px and pay attention to the weight of each image, below 100Kb for each image.


