
|
GuppY v5.0.0
February 15, 2014 CeCILL Copyright © 2004-2014 : Laurent Duveau Initiated by Laurent Duveau and Nicolas Alves |
|
|
GuppY v5.0.0
February 15, 2014 CeCILL Copyright © 2004-2014 : Laurent Duveau Initiated by Laurent Duveau and Nicolas Alves |
In the Data management area, STRUCTURE tab, a click on will take you to the configuration page of the options for dropdown menus boxes.
The dropdown menu boxes that you have created in the "dropdown menu boxes" section, are intended to put together a number of menus and sub-menus which visitors can click to have access to your contents. In this part of management area, you will assign these boxes of dropdown menus a number of options: number of hovered links, dropdown sub-menus (level 2), then level 3...
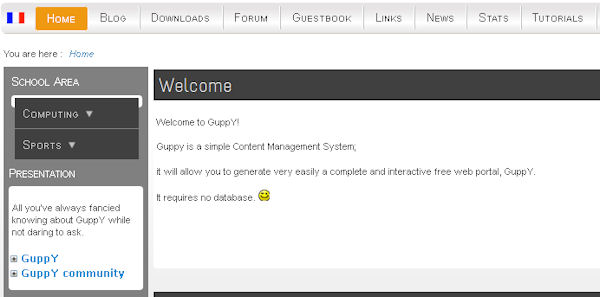
See below example of dropdown menu :
Vertical Dropdown menu "School area" closed position:
The 2 main levels:
Option 1 : Computing
Option 2 : Sport
Tiny arrows suggest that on mouse hovering, these two options (menus) will dropdown to level 2 menus..
See the same menu, opened on mouse hovering over Computing menu:
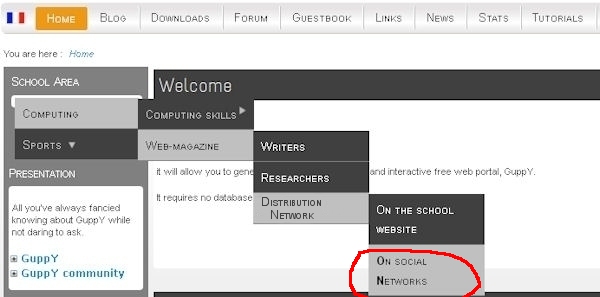
When activated by the mouse, level 1 and 2 menus show in light grey: Computing menu>Level 2 menu Web Magazine>Level 3 menu Distribution Network>Level 4 menu On social networks as a link to the relevant article.
Computing option has 4 levels :
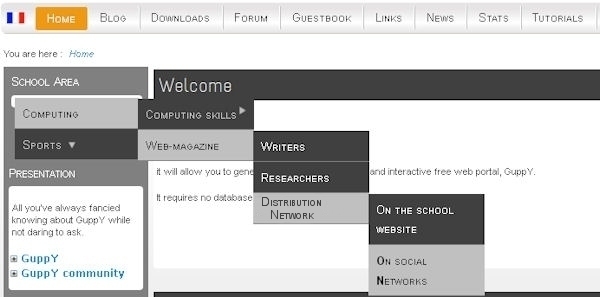
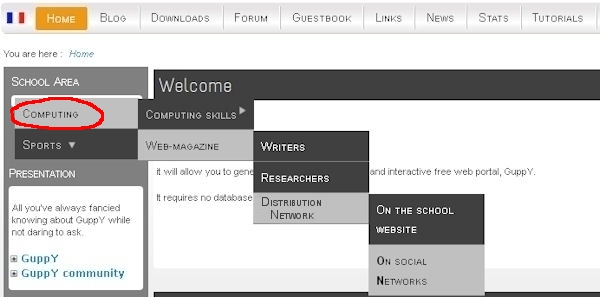
Let's have a look at the previous School Area dropdown menu.
In this help page, we will set up all the options Main Computing Menu to the end of the Dropdown Menu: Computing>Web Magazine>Distribution network>On social networks.
This is a cascading configuration to the last sub-menu that opens the article.
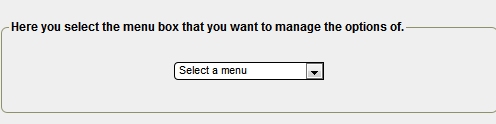
Structure tab>Dropdown menu options. The page displayed allows selection of the dropdown menu box you wish to assign options to. Here: School area.
Once drop down menu box has been selected, you get access to the page where to:
- see the existing options if there are.
- create new options of dropdown menu.
- Come back to selection of another dropdown menu box
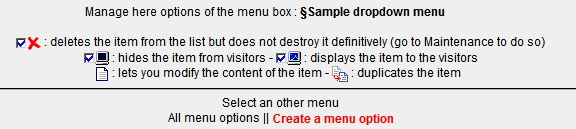
- When there are existing options:
- Duplicate option -
 Shox or hide the menu in the dans la dropdown menu box -
  Delete the menu.
Way to proceed:
Noter : each option is to be configured and saved one after the other.
Tip to get started: take a piece of paper (yes you do!) to set up a diagram of your dropdown menu and jot down all the configuration steps as you go. Configure the dropd own menu options one after the other according to the desired display order.
Creating option n°1 (Computing Menu)
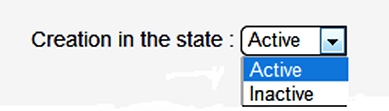


This the first option (first Computing menu, which shows on top as first level in the dropdown menu), so:
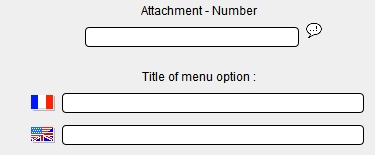
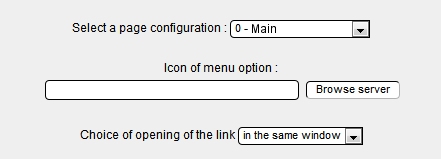
9. Box Icon of the menu option. You can choose an icon that will show next to the option title; for that purpose, please click the icon : "Browse server". In our example, there's no icon.
Choice of the link opening method: default is "in the same window". Leave it as is since there's no link in the box.
And eventually, don't forget to click the "save button"... so as to ..."save" your changes!
Passons à l'option suivante (dans notre exemple : 2ème sous-menu de l'option 1 Informatique : Webjournal)
How to set sub-menu level 2 Web magazine of the main menu n° 1 Computing. You are going to create a new menu option.
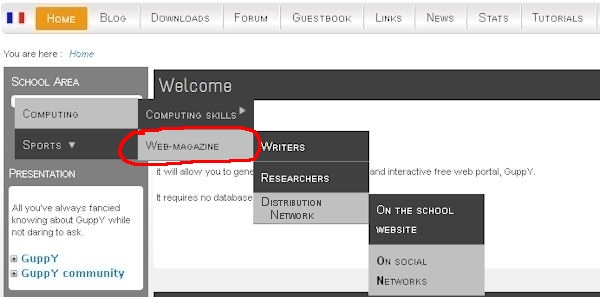

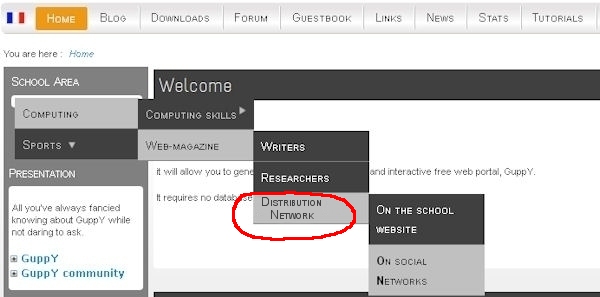
Let's see next option now : (in our example: Distribution Network is the third sub-menu of the 2nd sub-menu Web Magazine in the menu n°1 Computing).
How to set sub-menu level 3 Distribution Network of the second sub-menu Web Magazine in the menu n°1 Computing...
And here you go again creating another menu option.
It is this one inded that will take on a click the visitor to the corresponding content. There we need a link this time.
Configuring On Social Networks: 2nd sub-menu of the 3rd sub-menu Distribution Networks of the 2nd sub-menu Web Magazine in the menu Computing n°1
here you go again creating a new menu option.
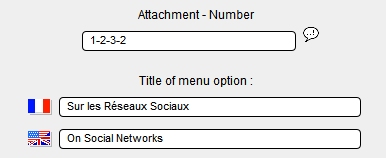
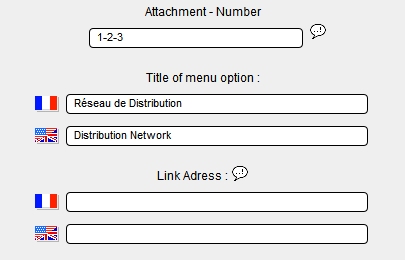
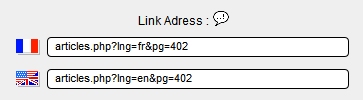
In this case, the corresponding article has n° ID 402 (the ID of your article is available in Data Management>Articles).
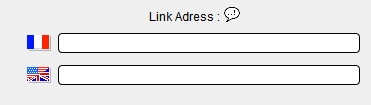
Type exactly :
articles.php?lng=fr&pg=402
in the box. Don't forget 2nd language field if activated on your site.
The other options for dropdown menu Sports, showing in yellow on this image :
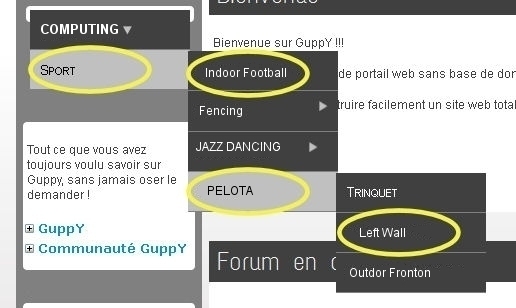
Attachment Number : 2
Title : Sport
Attachment Number : 2-1
Title : Inddoor football
Attachment Number : 2-4
Title : Pelota
Attachment Number : 2-4-2
TitLe : Mur à gauche
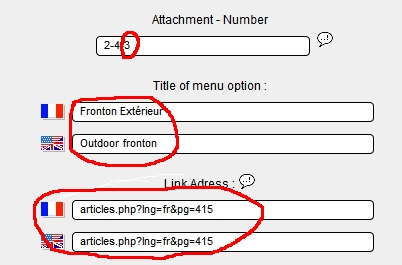
And to make things simpler with manipulations and avoid mistakes: you can click Duplicate the option in the list of all created options. Then you can modify it by adding the Attachment number missing to build one more cascade in the same option. Of course, you will change the title and you add a URL if needed before you save your work.
Example : I have duplicated this option :

I make the changes, showing in red, to add one more sub-menu into the cascade after sub-menu Pelota:
Enjoy yourself!

 © 2004-2013

